Thursday, October 26, 2017

Post 8: Shaping and Etching the Salad Fork

   I made the mistake to drill the holes before cutting the small fork out of billet, and it ended up imperfect, so I decided to use it to figure out whether I wanted to keep the pieces pretty flat with square edges the full thickness of the billet, or whether they would look better if they were slightly rounded with rounded edges.
    Also, there is the issue of the shape of the forks. For a reason I have not yet figured out, most forks have a double curve:


      I would actually like my Damask Silverware to have all the handles laying flat on the table and curving the same way. So I heated the head of the fork red and simply curved the teeth up, leaving out the other opposite counter curve. It is perfectly functional.


    I sanded the fork until the handle had a nice smooth curve, and the teeth were rounded on the bottom side.
      Just two 15mn dips in the etchant produced the same beautiful matte grey finish, which I actually may prefer to the traditional Damask finish. 


      The question is: how it would hold up? Maintenance may require a periodic 15 mn rejuvanating dip in the Ferric Chloride. Something to think about... 
       Another thing is that Damask Steel rusts, and should be kept oiled between uses. How is that going to change the finish? Easy enough to find out. I rubbed some olive oil on and wiped it dry. There is surprisingly NO CHANGE to the matte finish.

Post 7: Etching the Knife

       First, as a test, I gave a high polish to one side of the knife, leaving the blade with a medium polish and the handle with the original finish of the billet on the other side.


       I then tried etching the knife in Ferric Chloride, and the pattern appeared after just a few minutes. After 15 minutes or so, it looked pretty good, but very shallow:


      So I put it back in. After about an hour, it actually looked worse, and still not deeply etched, and I was dissappointed that the pattern actually looked fuzzy.
     Some research and a couple of YouTube videos later, I had a solution: take the knife out every 10 to 15 minutes and clean it with very fine steel wool to remove the oxyde, so the etchant has a fresh surface to act on. That worked well, and after 5x 15mn  dips, even though there was still not much depth, the knife looked a beautiful matte grey with a subtle pattern.

Wednesday, October 25, 2017

Post 6: Test Spoon

   I didn't want to waste any of my precious Damascus Billet, so I cut out a dessert spoon out of regular steel, and used a traditional forging technique to shape it. I don't have a forge, but my OxyAcetylene Torch did a good job of quickly heating the oval head of the spoon cherry red.
I then placed it on a piece of 2x4, and pounded it with a Ball Peen Hammer as it was burning a hole in the wood. Basic and smoky, but it worked allright for proof of concept.


    The repeated heating caused the spoon to turn black, and I like the rough hammered look. That could be a cheap way to make a set, just using regular steel.
    The problem is going to keep the size and depth of the sppons consistant, so I searched the Internet, and found a cast iron spoon stake at the Blacksmith Depot:


Saturday, September 30, 2017

Post 5: Cutting blanks for the other pieces

    The second billets  I got are harder, and regular drills will not work, but I happen to have a set of "Rodman Multipurpose Carbide Tip Drill Bits" I bought years ago but never used much because most metal I needed to drill was soft enough for regular bits. Now, these Rodman bits are quite amazing, and will drill not only stone, ceramic, porcelain, but also very hard steel like a file, as shown in this video.
    Sure enough, they could drill through the harder billet. I was missing some of the smaller sizes, so I ordered replacements and a couple of extras from Bad Dog Tools. The counterrotating saw did cut but seemed to dull quickly, so I am using instead a 4 1/2" grinder with thin metal cutting disks. I went ahead and made the blank for the Soup Spoon. The challenge was going to be with the forks, so I planned my straight grinder cut carefully, and drew them on the billet. I sprayed the Sharpie lines lightly with fixative:


     I drilled 1/8" holes between the teeth of the forks. It ended up easy enough to shape the blanks for two forks. The billet gets hot and needs to be cooled periodically in a bucket of water. I started grinding the blade of the knife:


     I believe it will probably be best to refine the shapes of the blanks as much as possible before bending the forks and spoons to shape, which will require heating with a torch. I am debating how to do the spoon, and think I will start shaping it by grinding the center on one side and the edges on the other. Then, I can heat it red with a torch and deepen the cup hitting the center with a ball pen hammer. I will test it with a regular piece of steel.

Wednesday, September 13, 2017

Post 4: Billet Procurement, Design

     I started looking for Damascus Billet cheap enough to make the Project feasable without breaking the bank.  A complete set of silverware for 12, with 5 pieces per person and 4 serving pieces will require some 55 pieces of Damascus steel. There is a place right here in Alabama that makes Damascus Steel, but it is expensive, as anything American made. I will have to settle for Damascus forged in Pakistan or India.
   The cheapest billet I found was $19.99 at Smoky Mountain Knife Works, imported from China, but is unfortunately out of stock. It comes in several patterns, and is listed as 12"x2"x1/4", which is big, and could possibly allow me to get two pieces out of each billet, cutting the costs considerably.
   I wanted of course to get started right away, and found some billet on Amazon for $29 which I ordered and got in 2 days. It turned out to be particularly easy to work with, and has a beautiful raindrop pattern:

   I cut and ground the basic blank for a knife pretty quickly,  as shown in the previous post:


    There were no more of those available, so I ordered two more expensive billets from different places to try to cut a spoon and a fork. They turned out to be substantially harder than the first one, so I tried to figure out how to anneal them, which as it turns out can be difficult for Damascus. I considered asking a friend to use his pottery kiln, and also found a local heat treating place.
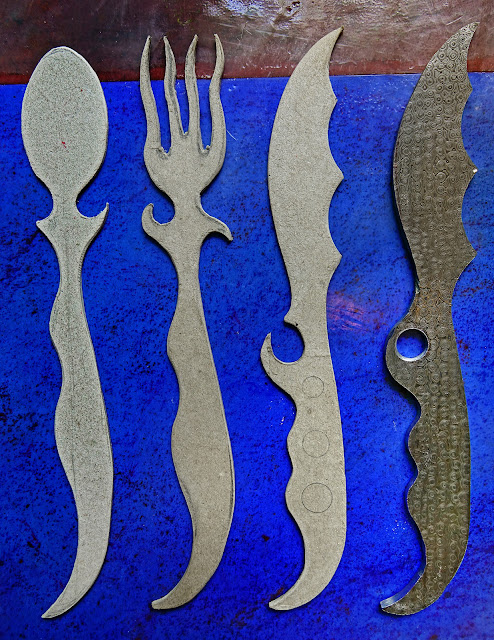
    I kept looking for other sources, and found a set of 3 on Etsy of all places, shipping from England. Amazingly, it was here this morning, shipped with DHL. These are unfortunately only 9"x1.75" instead of the 10"x2" listed, too small for the fork and spoon, but fortunately big enough for salad forks. I made a smaller cardboard fork and a dessert spoon to test their handling, as it is important to me that all the pieces fit the hand comfortably and ergonomically. Here is the complete set. As you can see, I decided on the holes:


Sunday, September 3, 2017

Post 3: Moving Ahead faster than I though

I started drawing what I thought was going to be a whole series of design variations, but ended up liking my very first draft so much that I went ahead with it. First, I cut out a test knife out of a bar of ordinary Home Depot steel for practice. I hammered the narrow blade, which gave it a curve, and that made me decide on the grinding route instead of trying to forge. It's a lot easier, and I already have pretty much all the tools. I used paste Gun Blue to turn the handle black:


    Then, I drew the knife, spoon and fork full size, and made some cardboard mockup. I wonder about making them out of ordinary steel for practice, but then decided to cut out a blank for the knife directly out of the bar of Damascus Steel I had just received:


   The steel was actually much softer than I was expecting, about the same as the cheap one. I used my counter rotating tungsten blade tool to rough out the shape, a disk grinder to refine the convex shapes, and my small belt grinder to shape the concave curves. The diameter of the upper pulley is exactly what I needed. I also used an air grinder with a straight tungsten bit. I am debating about drilling a set of 3 graduated holes down the handle... I am also debating whether to leave the shapes square, or to round the whole thing, which would have the advantage of making the pieces lighter, but would take a whole lot more time. I may have do do a test piece each way and show them to Rachel.
   Also, trying to decide what kind of profile to use on the blade: V, shallow V, hollow ground, or convex (the easiest, and sturdiest, least likely to crack on tempering, and sufficiently sharp for a table knife):


Tuesday, August 29, 2017

Post 2: Getting some Blanks and Sketching Ideas

    Just out of curiosity, I checked on Amazon, and did find a couple of 10"x2"x4mm blanks for $29.99 with Prime, so I went ahead and ordered them, one Rain drop, and one Swirl. I should have them on hand by to morrow night, so it's time to grab a pencil and srart sketching out ideas for knives, forks, soup spoons, and dessert spoons, plus some serving pieces. I am very excited about this project, and very curious to see just how hard the Damascus Steel is to work with...
    I watched some videos on knife making, and believe I have pretty much most of the skills and all the tools necessary, having worked with steel, bronze, brass and aluminum for years, casting, grinding, polishing and finishing my own bronze and cast iron sculptures.
   I am definitely going to need my pneumatic sanders and grinders. My old compressor blew out a reed, and is not worth repairing. It was too weakanyway, so I am on my way to Harbor Freight to get a slightly bigger one that happens to be on sale right now:


   As I always do when I start a new Project, I researched knife making and knife makers, concentrating on Damascus Steel, and discovered some extremely talented Artists and Craftsmen. Here are some outstanding examples I gathered of fixed blade knives:


   Even if it is not exactly part of the Project, I also took an interest in Folding Knives, with the idea I might try my hand at that too. There are such outstanding examples out there:


     I am particularly interested in learning the Filework on the back edges and plates.

    I now want to single out here a very special Artist who has been doing amazing work in California, after receiving a BFA in Jewelry and Metalsmithing from the Rhode Island School of Design, and is receiving a lot of well deserved recognition for his supremely sophisticated and elaborate work:  
    Here are some of his incredible creations, on which he lavishes in the neighborhood of 400 hours:


   Now, not only is he a true Master at his craft, but unlike others, he is willing to share, and has taken time to document step by step with pictures and videos on Flickr the Making of his iconic "ALCHEMY"


Post 8: Shaping and Etching the Salad Fork

   I made the mistake to drill the holes before cutting the small fork out of billet, and it ended up imperfect, so I decided to use it to ...